DSP Environment
Preparation
In order to develop HiFi5 DSP, you need to downoad Software Packages and prepare Xtensa Xplorer License first.
Software Packages
Download the software packages according to your operating system.
Item |
Packages |
Comment |
|
|---|---|---|---|
Xtensa Xplorer installer |
Linux |
|
|
Windows |
Xplorer-9.0.18-windows-installer.exe |
||
HiFi5 DSP configurations |
Linux |
|
|
Windows |
|
Get them from Realtek released
DSP SDK (
configurations folder) |
|
Xtensa Xplorer License
Xtensa Xplorer license is also essential along with the software packages.
You can send an E-mail to <claire_wang@realsil.com.cn> to apply for a temporary license.
When sending the E-mail, the following information is needed:
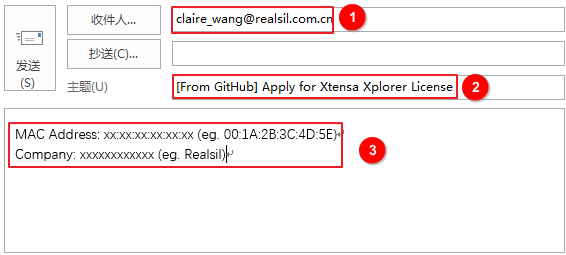
Essential Information
MAC address
Company
University & School (for students only)
Note
One cunstomer can only apply for one license.
The validity period of the temporary license is 3 months.
Installing Toolchains
Install the Xplorer, a GUI based IDE tool provided by Cadence to build DSP applications.
Windows
Installing Xtensa Xplorer
Double-click the installer and follow the prompts to install it. The installer used in this guide is Xplorer-9.0.18-windows-installer.
After the installation is complete, opening Xplorer GUI will usually remind you to update the software. Be sure to update the software, because the new patch will fix some toolchain problems. These problems can cause compiler crashes. If you encounter a situation where the compiler crash when compiling a certain piece of code, update the toolchain and try again.
Note
Remember the path when installing the IDE. The path we use is C:\usr.
Installing HIFI5_PROD_1123_asic Build Configuration
Build Configuration is a term that describes all parameters and necessary builds for the Tensilica processor implementation you are developing with. It is mandatory to install a specific build configuration before starting development on DSP. We will use the default SDK named “dsp” in the following sections. Contact Realtek’s FAE if you haven’t got it.
Double-click RUN Xplorer 9.0.18 on the desktop (or from the start menu).
Click Browse to set the workspace to
<dsp_sdk>\project.Caution
The workspace can’t be set freely.
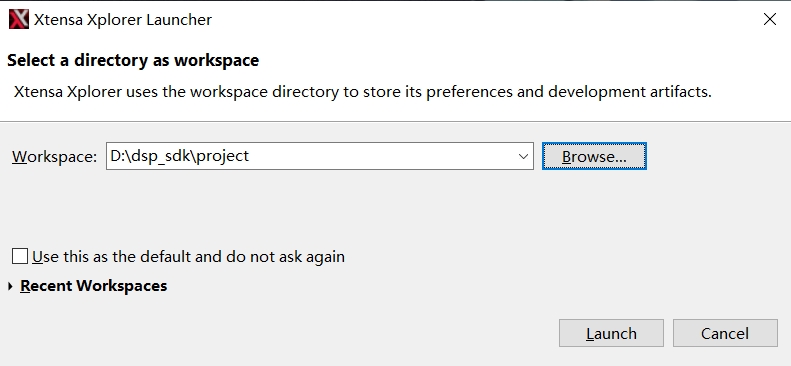
Click Launch to enter the main window of Xplorer.
The build configuration can be installed into the IDE using the System Overview panel which is in the lower left corner by default.
If this panel is not visible, it can be toggled using menu . Right click on Configuration and select New Configuration.

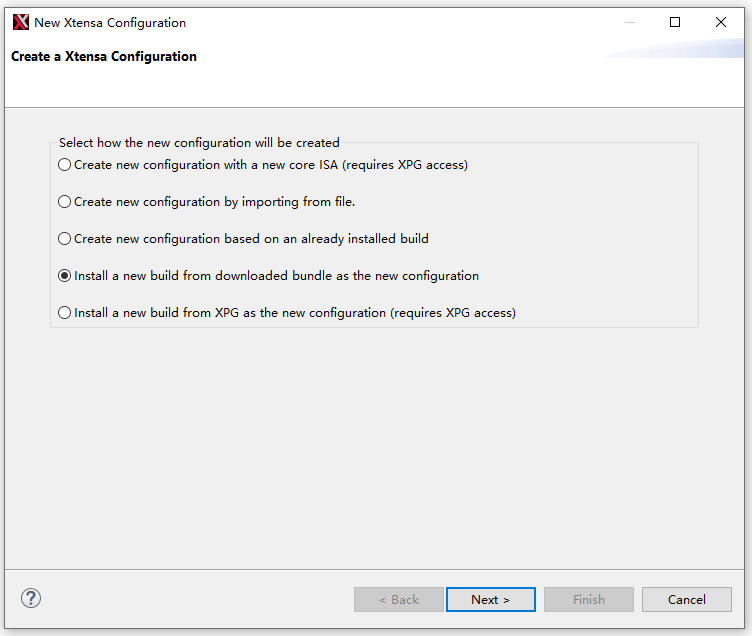
Select the fourth item in the new pop-up window, then click Next.
Click Browse to find the corresponding configuration file (by default under
dsp\), then click Add Build, and finally click Finish.HIFI5_PROD_1123_asic_UPG_win32_redist.tgzis for CALL0 ABI, andHIFI5_PROD_1123_asic_wUPG_win32_redist.tgzis for window ABI. Take CALL0 ABI configuration as an example: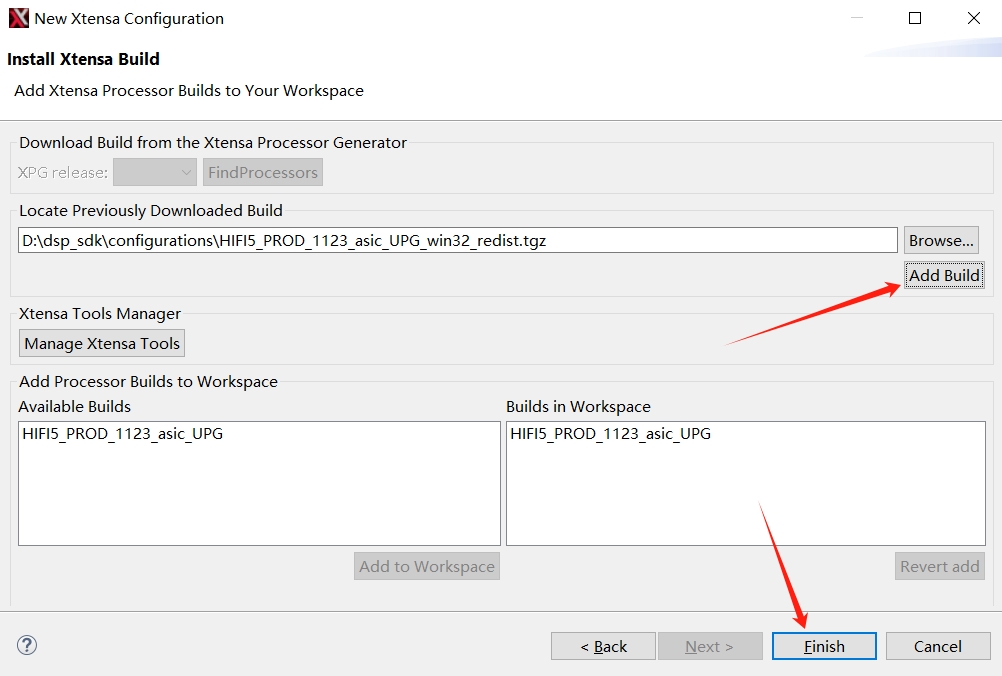
If the entry in the red box below appears in System Overview, the configuration has been successfully installed.
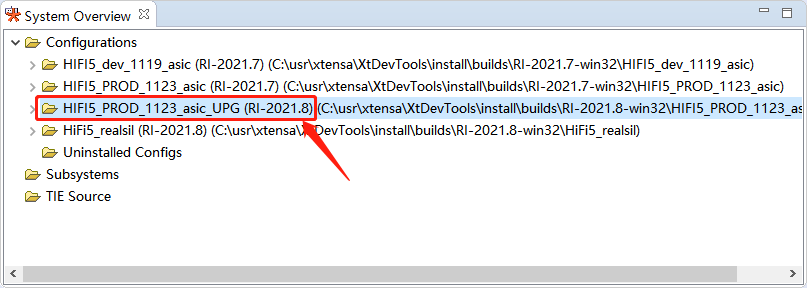
Then, you can use the same procedure to install another window ABI configuration. We recommend to add the bin directory of Xtensa tool to the system path, otherwise some helpful scripts may not find the executable.
For Windows, the bin directory is C:\usr\xtensa\XtDevTools\install\tools\RI-2021.8-win32\XtensaTools\bin.
Note
The python script version for post-processing is recommended to be python3.8. You may encounter problems if using python3.11.
Installing Xtensa on Chip Debugger Daemon
The Xtensa on Chip Debugger Daemon (xt-ocd) is a powerful GDB-based debugging tool.
It is not installed by default with the Xplorer IDE. A self-extracting executable installer is included with the Xplorer.
The following is a brief installation method of xt-ocd. For more xt-ocd installation guide, refer to xtensa_debug_guide.pdf.
Windows: If Xplorer’s installation path is
C:\usr\xtensa\XtDevTools\downloads\RI-2021.8\tools\xt-ocd-14.08-windows64-installer, due to differences in installation paths and software versions, the paths and installer’s name may be different.Linux: Assuming Xplorer is installed under
/opt/xtensa:cd /opt/xtensa/XtDevTools/downloads/RI-2021.8/tools/ sudo ./xt-ocd-14.08-linux64-installer
xt-ocd will be installed in this path by default:
/opt/Tensilica/xocd-14.08
The j-link driver needs to be installed additionally. Note that the J-link driver version should not be too new, tested V6.20 and V6.44 can meet the requirements. The j-link driver will be installed in the path
/opt/SEGGER/by default. After the installation is complete, you need to execute:ln -s /opt/SEGGER/JLink_V644i/libjlinkarm.so.6 /opt/Tensilica/xocd-14.08/modules/libjlinkarm.so.6
If the libncursesw.so.5 file cannot be found on your system:
sudo ln -s /lib/x86_64-linux-gnu/libncursesw.so.6 /lib/x86_64-linux-gnu/libncursesw.so.5
When you debug in Xplorer, if the error is as follows:
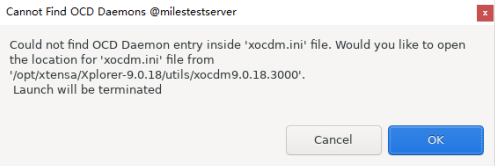
You need to add a line after # [XOCDInstallations] in file /opt/xtensa/Xplorer-9.0.18/utils/xocdm9.0.18.3000/xocdm.ini:
14.08=/opt/Tensilica/xocd-14.08
Installing a License
There are various ways to install a license, here we describe how to install a license in Xplorer when licenses are managed on a server.
Click Help in the upper part of Xplorer, and choose Xplorer License Keys.
Click Install Software Keys.
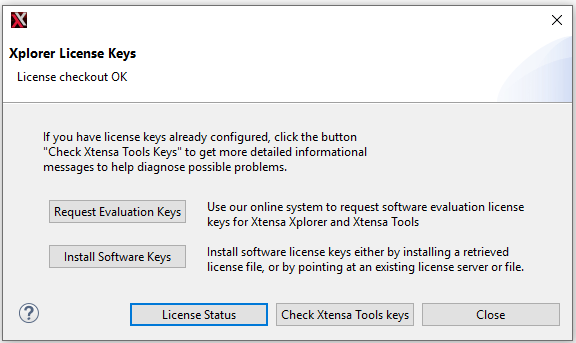
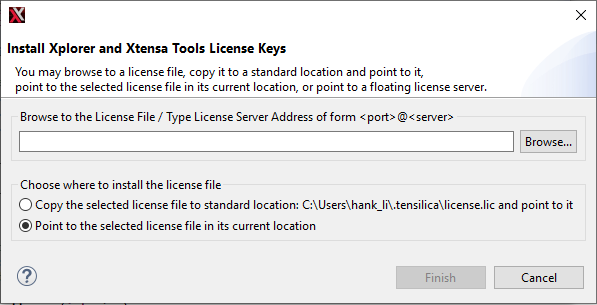
Fill in the blank with the server’s port and IP address, select Point to the selected license file in its current location, and click Finish.
Linux Server
This section describes how to install Xplorer-9.0.18 on the Linux server and compile the Xplorer project using headless mode (from command line) on the server.
The headless mode only occupies the license for a short period of time during compilation, which alleviate insufficient licenses problem.
In the following installation process, we recommend using the sudo command instead of the root account.
Installing Dependent Packages
sudo apt-get install libxi6 libxtst6 libxrender1
If you install Xplorer in a Linux server (such as Ubuntu Server 20.04 LTS) but display Xplorer GUI on local PC (X11 forward), we recommend to install GTK support package:
sudo apt-get install libgtk-3-dev
Installing Xtensa Xplorer
chmod +x Xplorer-9.0.18-linux-x64-installer.bin
sudo ./Xplorer-9.0.18-linux-x64-installer.bin
The default installation path is /opt/xtensa. Other components can select all yes.
After the installation is complete, opening Xplorer GUI will usually remind you to update the software. Be sure to update the software, because the new patch will fix some toolchain problems. These problems can cause compiler crashes. If you encounter a situation where the compiler crash when compiling a certain piece of code, update the toolchain and try again.
If Xplorer GUI cannot be opened through X11, you can manually download and install the patch.
The patch we provide (XtensaTools_RI_2021_8_patch734507_linux.tgz) is not necessarily the latest, so it is recommended that users consult Cadence or download the latest patch for XtensaTools_RI_2021_8 through XPG. First copy the patch package to the xtensa tool path (for example: /opt/xtensa/XtDevTools/install/tools/), then decompress the patch and overwrite the original RI-2021.8-linux folder.
Adding a License
To set Xtensa license, add the environment variable LM_LICENSE_FILE or XTENSAD_LICENSE_FILE to the full path of the license file for a node-locked license or <port>@<server> for a floating license (where <port> is the port number noted in Prepare the Floating License File, and <server> is the name of the license server). Example:
export LM_LICENSE_FILE=<port>@<address>
source /etc/profile
Installing HiFi5 Configuration
Decompress the configuration (for window ABI) to the corresponding directory:
cd /opt/xtensa/XtDevTools/install/builds/
sudo tar -zxvf HIFI5_PROD_1123_asic_wUPG_linux_redist.tgz
sudo tar -zxvf HIFI5_PROD_1123_asic_UPG_linux_redist.tgz
The example directory structure after decompression:

Install configuration (for window ABI):
cd /opt/xtensa/XtDevTools/install/builds/RI-2021.8-linux/HIFI5_PROD_1123_asic_wUPG
sudo ./install
Input Xtensa Tools Path (change according to the actual installation path):
/opt/xtensa/XtDevTools/install/tools/RI-2021.8-linux/XtensaTools
What registry would you like to use? [keep default]
Do you want to make "HIFI5_PROD_1123_asic_UPG" the default Xtensa core? [y] [keep default]
Use the same installation procedure to install the CALL0 ABI configuration package
HIFI5_PROD_1123_asic_UPG_linux_redist.tgz.
Coping Configuration Registration File
cd /opt/xtensa/XtDevTools/install/tools/RI-2021.8-linux/XtensaTools/config
sudo cp HIFI5_PROD_1123_asic_UPG-params /opt/xtensa/XtDevTools/XtensaRegistry/RI-2021.8-linux/
sudo cp HIFI5_PROD_1123_asic_wUPG-params /opt/xtensa/XtDevTools/XtensaRegistry/RI-2021.8-linux/
We recommend to add the bin directory of Xtensa tool to the system PATH. Otherwise some helpful scripts may not find the executable.
For Linux, the default bin directory is /opt/xtensa/XtDevTools/install/tools/RI-2021.8-linux/XtensaTools/bin/.
Compiling with CMD
You can use auto_build.sh to compile the project:
cd <dsp_sdk>/project/auto_build
./auto_build.sh
Xplorer will copy project_dsp to a new workspace auto_ws then build the project.
The generated dsp_all.bin and dsp.bin are saved in default <SDK>/dsp/project/image directory.
Therefore, some intermediate compilation files will remain in the auto_ws directory.
Refer to <SDK>/dsp/project/auto_build/readme.txt for the use of auto_build.sh.
Troubleshooting
The python script version for post-processing is recommended to be python3.8. You may encounter problems if you use python3.11. If you do not want to change the default Python version of the system, refer to the note in Section Build a Program to change the post-processing command (right click on project_dsp, then select ). Specify the python3.8 in the post-build command.
If you have other versions of Xplorer installed on your system and put there bin directory in your system PATH, when you directly use xt-clang and xt-ar (e.g. using with Cmake, Makefile or python) to compile or link your code rather than Xplorer, the registry value problems may be encountered during the link process: Either the current Xtensa configuration is not properly installed or you are using Xtensa Tools from a different location than you specified when installing the configuration.
If Xplorer can compile the SDK normally but with your method the above problems occur, the problem is generally caused by the bin directory of other versions of the Xtensa tools included in the system path. Check the settings of PATH, such as the profile file. Then re-open a new terminal. Sometimes, the temporary settings in the session also cause PATH problems.
There are some problems that need attention:
Current
dsp_batch.xmldefault import and compile project_dsp project. If you need to change the compiled project, target or configuration, change thedsp_batch.xmlfile, or use Xplorer batch build to generate xml file. (refer to Xplorer help: , using batch build)The default Xplorer IDE is
/opt/xtensa/Xplorer-9.0.18/xplorer, setauto_build.shaccording to the actual installation location and Xplorer version.Currently, Xplorer on the server side creates a new workspace (
<sdk root>/dsp/auto_ws) and imports the project into the new workspace for compilation. The script will automatically empty and re-import projects, otherwise the project modification on the local Xplorer cannot be synchronized.Since auto build clears auto_ws workspace every time, so it is fully compiled every time.
We recommend to modify project with Xplorer GUI. However, if there is no GUI but the project must be modified, we provide a temporary solution: directly edit <dsp sdk>/project/project_dsp/.project file.
Add a new virtual folder:
<link>
  <name>TestFolder</name>
  <type>2</type>
  <locationURI>virtual:/virtual</locationURI>
</link>
Add a file to the virtual folder:
<link>
  <name>TestFolder/test_file.c</name>
  <type>1</type>
  <locationURI>PARENT-2-PROJECT_LOC/testfolder/test_file.c</locationURI>
</link>
Note
Modify project configuration (e.g. modify compilation options, add and delete files, etc.), a GUI Xplorer IDE is required.
On linux server, the Xplorer GUI window can be displayed on the local terminal using the X11 protocol.
The method is as follows: Check the contents of /etc/ssh/sshd_config. In this file flag X11Forwarding should be set to yes. Then:
>> sudo apt-get install dbus-x11
>> /opt/xtensa/Xplorer-9.0.18/xplorer
Xplorer’s GUI window will pop up on the local computer. Set the workspace as <dsp sdk>/project.